Contoh ini menunjukkan satu techinque untuk input sensor kalibrasi. Board mengambil pembacaan sensor selama lima detik saat mulai, dan melacak nilai tertinggi dan terendah yang didapatnya. Pembacaan sensor ini selama lima detik pertama dari eksekusi sketsa menentukan nilai minimum dan maksimum yang diharapkan untuk pembacaan yang diambil selama pengulangan.
Alat dan Bahan :
// apply the calibration to the sensor reading
sensorValue = map(sensorValue, sensorMin, sensorMax, 0, 255);
Inilah seluruh programnya :
Semoga bermanfaat buat yang berkunjung di blog saya ini.
Terimakasih! ;)
Alat dan Bahan :
- Arduino or Genuino board
- LED
- analog sensor (a photoresistor will do)
- 10k ohm resistor
- 220 ohm resistor
- hook-up wires
- breadboard
Rangkaian :
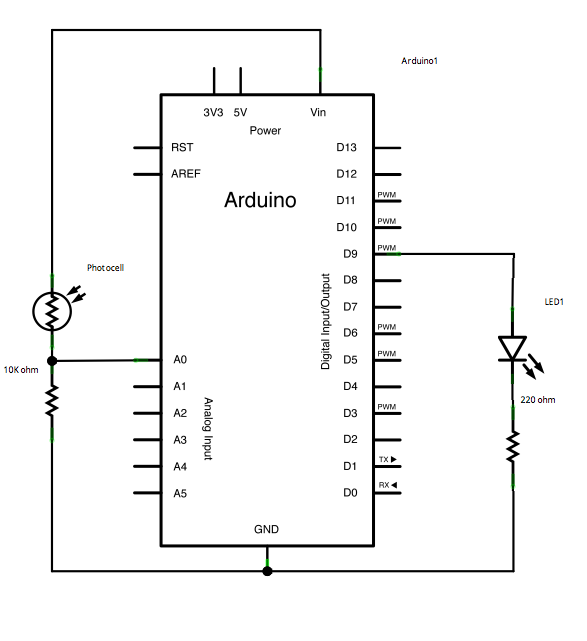
Hubungkan LED ke pin digital 9 dengan resistor pembatas arus 220 ohm secara seri. Hubungkan photoresistor ke 5V dan kemudian ke analog pin 0 dengan resistor 10K ohm ke ground.
Skematik :
Listing Program :
Sebelum pengaturan, Anda menetapkan nilai awal untuk minimum dan maksimum seperti:
Ini mungkin tampak mundur. Awalnya, Anda mengatur tinggi minimum dan membaca untuk yang lebih rendah dari itu, menyimpannya sebagai minimum baru. Demikian juga, Anda mengatur rendah maksimum dan membaca untuk sesuatu yang lebih tinggi sebagai maksimum baru, seperti:int sensorMin = 1023; // minimum sensor value int sensorMax = 0; // maximum sensor value
// calibrate during the first five seconds
while (millis() < 5000) {
sensorValue = analogRead(sensorPin);
// record the maximum sensor value
if (sensorValue > sensorMax) {
sensorMax = sensorValue;
}
// record the minimum sensor value
if (sensorValue < sensorMin) {
sensorMin = sensorValue;
}
}
Dengan cara ini, setiap bacaan lebih lanjut yang Anda ambil dapat dipetakan ke kisaran antara minimum dan maksimum seperti ini:// apply the calibration to the sensor reading
sensorValue = map(sensorValue, sensorMin, sensorMax, 0, 255);
Inilah seluruh programnya :
// These constants won't change:
const int sensorPin = A0; // pin that the sensor is attached to
const int ledPin = 9; // pin that the LED is attached to
// variables:
int sensorValue = 0; // the sensor value
int sensorMin = 1023;        // minimum sensor value
int sensorMax = 0;           // maximum sensor value
void setup() {
// turn on LED to signal the start of the calibration period:
pinMode(13, OUTPUT);
digitalWrite(13, HIGH);
// calibrate during the first five seconds
 while (millis() < 5000) {
   sensorValue = analogRead(sensorPin);

   // record the maximum sensor value
   if (sensorValue > sensorMax) {
     sensorMax = sensorValue;
   }

   // record the minimum sensor value
   if (sensorValue < sensorMin) {
     sensorMin = sensorValue;
   }
 }
// signal the end of the calibration period
digitalWrite(13, LOW);
}
void loop() {
// read the sensor:
sensorValue = analogRead(sensorPin);
// apply the calibration to the sensor reading
sensorValue = map(sensorValue, sensorMin, sensorMax, 0, 255);
// in case the sensor value is outside the range seen during calibration
sensorValue = constrain(sensorValue, 0, 255);
// fade the LED using the calibrated value:
analogWrite(ledPin, sensorValue);
}
Semoga bermanfaat buat yang berkunjung di blog saya ini.
Terimakasih! ;)


0 Response to "Program Calibrasi pada Arduino"
Posting Komentar
[[ Silahkan berkomentar yang sesuai dengan topik, Mohon Maaf komentar dengan nama komentator dan isi komentar yang berbau PORNOGRAFI, OBAT, HACK, JUDI dan komentar yang mengandung LINK AKTIF, Tidak akan ditampilkan. Terima Kasih! ]]